Saturday, 11 February 2017

Carving Stamps with Kat Lendecka

If one print themed workshop wasn't enough this week, I booked myself on a 2 hour workshop with Kat Lendecka.

I found her on Instagram and really got into her work and process.  Her posts quite often are mini videos showing a snapshot of her process often including a reveal of a print she was working on.


During the day it had been snowing and I hoped that it wouldn't settle or freeze on the ground.  I'm a bit nervous of driving in either of those conditions.  Fortunately, once it was time for me to leave it was fine.

When I arrived I was greeted by Kat and her lovely whippet.  I was about 3 minutes late as I couldn't see the door numbers in the dark, I was so pleased when she came out to meet me I felt such a fool wandering about with a torch shining it on the other doors.

Once inside we made at start.  I was introduced to the other 3 participants all who lived locally.  Then Kat made us all a cup of tea and started to talk about what we could expect from the evening.  She shared a little of her background and it was interesting to hear how she had progressed after leaving university.  From a student studying graphics, who almost lived in the print studio to leaving university with the realisation that to continue would incur a huge expense for all the printing equipment.  It was at this point that she decided that keeping her practice low key she could not only continue to be a Mum at home but also work on her practice using lino-cutting and stamp carving to create affordable prints.  I have to say whilst the workshop was running a couple of "kerchings" rang out on her phone from her etsy shop (see below Cat and Owl print for link).

Cat and Owl £20 by Kat Lendacka (etsy shop)
I was really pleased I had come prepared to the workshop.  I'd spent a little while earlier on sketching some possible ideas for stamps.  Working on the same theme that I am using at my jewellery class I decided to sketch down a garden door, a cage and a key.   Kat gave us each a small piece of the blue easy cut lino to practice on.  We were instructed to trace the design using tracing paper then transfer it onto the lino.  Then using one of the finer tools cut around the image.  Making sure to work outside the lines each area of negative space was removed.  This is where, you have to make the decision on whether your stamp will be a positive or negative image.  An this is where my head starts to turn itself inside out in a bid to get it right.

My practice stamp was the key.  I worked carefully working slowly and zoned out from the room as I gently carved the rubber way.  Once completed, Kate cut the excess away.  I tested the stamp to check to see if I had a clean image.  Not bad for my first attempt.  Then I moved onto creating a the larger cage stamp.  This was quite challenging and I was a little worried that I would cut into the important lines.

However, the result was just fine.  Again I tested the stamp.  I did this by stamping over the key so it would look trapped in a locked cage.

Before I knew it it was nearly time to go home.  And so for the last 20 minutes we printed our stamps onto cards.  I played around with the colours to achieve different effects.

What a wonderful way to spend a Friday evening.  If you would like to attend one of Kat's workshop her website is www.katlendacka.com

More images from the evening can be found here

Thursday, 9 February 2017

Taster Print session at Leicester Print Workshop

Ruth Singer from the Leicester Design Factory group had organised a taster print session at Leicester Print Workshop using funding from the Design Factory which was initially open to members in the area, then to was offered to surrounding groups. I jumped at the chance. It had been a long time since I had done print, almost 10 years in fact and my memories of the experience weren't that great. But I do remember being curious at the effects that could be achieved. And as an added bonus it was free for Design Factory members.


It was an evening workshop, which didn't appeal to me but I understand that this is convenient for others who work during the day. I was a bit miffed when I ended up parking in a multi storey car park close by and then spotted as I drove up the ramp to the barrier that it was going to cost £12 for the 3 hours which I thought was extortionate but it was a bit late to change my mind by that stage.

When I arrived most people were already seated around the waiting area. A few more of the group arrived then we were introduced to our host Sumiko Eadon who is one of the artists in resident.

Firstly we were taken a tour of the workshop. I found the space to be airy, with excellent light and a very calming atmosphere which I found refreshing. We were shown the various areas of the workshop and then taken to the collective area we would be working in. Sumiko then provided for us a short demonstration on the various ways to achieve a mono print.

She made it look so easy and effortless, but I guess this is because of the years of experience she has. I have always found printing intriguing, but it's one of those processes that is messy and time consuming. I think you need to know what you want to achieve before you start, but you also need to know what is achievable, a bit like a chicken and egg conundrum. Having said that, once I got started and I began to understand the process a little, I started to relax and enjoy myself more.  Working in mono print means you ink up a metal or plastic plate then you can either draw into the surface like Amelia Kirk is doing here on the right.  Alternatively you can lay things onto your plate top it with dampened paper then roll through the press.

Feathers and twig mono print by Phiona Richards
It's all about understanding the layering, which I find difficult.  To me, it feels like you are working back to front.  And the colours you use make a huge difference to the outcome. The black or any other single colour gives a really dramatic effect whilst adding extra colour adds another dimension to the prints.  I experimented with the feathers, twigs, scrunched up paper.  I drew into the surface.  The results were very pleasing but I did feel like an infant with my first set of crayons.

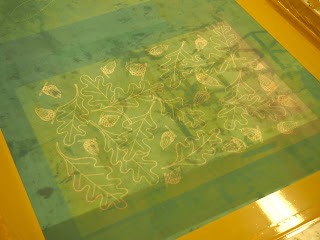
Oak leaf and Acorn screen ready for printing
The next technique we were shown was screen printing. Prior to the workshop we were asked to send through a jpeg or pdf file of a simple drawing so that a screen could be prepared for us.  Mine was oak leafs and acorns a theme I had been working on at the end of the year.

I did enjoy this technique and would perhaps like to learn more about it.  I'm wondering whether there is an easier way to do it at home.  I'm sure I've seen ideas on Pinterest. I must explore this further.

My screen was supposed to be a repeat pattern but after the initial drawing and preparing it for photoshop, it became very time consuming trying to make the background one colour.  I just wasn't sure what would be picked up in the background and I wanted it to be a line drawing.  Screen printing  is a great technique to produce multi prints.  I know you can use it on fabric as well.

Two tone mono print
Lastly, Kelly McCrobie and Ruth Singer from our group, took over the last part and showed us how
to do flocking and foiling.  It was quite a difficult one to demonstrate as the screens we had prepared weren't really open enough to squeeze the adhesive through but through grit and determination Kelly managed it.  Once the adhesive was dry she placed the foiling plastic over the design and placed it in a heat press machine for 15 seconds.  Once out of the machine she waited for the foil to cool before peeling the excess back.  The effect was shiny and so attractive, we ladies love our glitz and glamour. Apparently this is something you can replicate at home using a glue stick and house iron.

I had a go at this technique by using a fine brush and drew Rare Notions onto a piece of calico.  The result was basic but useable.  I think I will work into it with stitch and other embellishments.


All in all it was a very informative evening.  I would have like to have a go at lino cutting but as I have booked myself on a two hour evening course carving rubber stamps on Friday I wasn't too bothered

More images from the evening can be found here
SaveSaveSaveSaveSaveSaveSaveSave